 ff45b46c49
Only one side may write the mounted image or the /data partition at a time,
and uploaded images are validated before they are stored.

Image mounts:

* Serve every mounted image read-only, in CD-ROM and mass storage mode alike:
  detach the LUN first and set the read-only flag before the image is
  attached, so the target machine can neither write to nor format it. The
  flags were previously only written for CD-ROM mounts, so a mass storage
  mount inherited ro=0 and the image stayed writable from the host.
* Report the virtual disk as on only while the LUN really carries the /data
  partition. With an image mounted the switch used to stay active but
  unchangeable, and enabling the disk is now a confirmed action instead of a
  rejected one: it cancels the mounted image, and the confirm also warns that
  the image download is interrupted because /data becomes read-only here.
* Ask before mounting: the image list warns that the virtual disk is released
  for the image, or offers to enable it first when it is off, instead of
  dropping the /data share silently. The new strings are translated for every
  locale.
* Name the mounted medium and the USB device after the image file, cut to the
  16 bytes of the SCSI inquiry product field and the 126 bytes of the USB
  product string, and restore the previous names on unmount.
* Reset the LUN flags on every gadget restart. They survived a restart, so
  the shared partition came back to the host read-only, or as an optical
  drive, after an image had been mounted.

The /data handover:

* Mount /data read-only at boot whenever the virtual disk serves the raw
  partition as a writable disk, so the handover holds from the first boot on.
* Add SetDataWritable(), which remounts /data and verifies the new state.
  Enabling the virtual disk makes /data read-only before the host can write
  it, and refuses to expose the disk when the remount fails instead of taking
  the risk. Unmounting an image, which hands the raw partition back to the
  host, does the same, while mounting an image switches /data back to
  writable because a served image is read-only for the host.
* Cancel a running image transfer before the handover and wait for it to
  stop, and report the state in the image list, where mounting still works
  while deleting and uploading do not. The delete action is disabled with a
  hint, and the downloader offers to turn the virtual disk off.

Image uploads:

* Validate the volume descriptors while streaming, so an unusable image is
  rejected in seconds instead of after the whole transfer: accept ISO 9660 and
  UDF volume descriptors (CD001, BEA01) as well as raw disk images (GPT, APFS,
  HFS+, MBR), and reject anything else. Require the image to fit in /data with
  a 128 MiB reserve before any of it is received, log the underlying errors on
  the rejection paths, and keep the temporary file, the progress ticker and the
  close handling in defers.

Add unit tests for the upload header check, the free space preflight and the
image name truncation.
NanoKVM
🌟 What is NanoKVM?
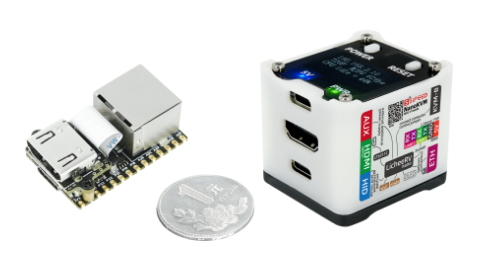
NanoKVM is a series of compact, open-source IP-KVM devices based on the LicheeRV Nano (RISC-V). It lets you remotely access and control computers as if you were sitting in front of them, making it useful for servers, embedded systems, and other headless machines.
📦 Product Family
Choose the NanoKVM model that best fits your deployment:
- NanoKVM-Cube Lite: A barebones kit for DIY users and bulk deployments.
- NanoKVM-Cube Full: A ready-to-use kit with a case, accessories, and a pre-flashed system SD card.
- NanoKVM-PCIe: A PCIe-bracket form factor for internal chassis mounting. It draws power from the PCIe slot and supports optional Wi-Fi and PoE.
- NanoKVM-Pro: A higher-performance version with major upgrades:
- Resolution: Up to 4K@30fps / 2K@60fps.
- Network: 1Gbps Ethernet + PoE + Wi-Fi 6, upgraded from 100Mbps Ethernet.
- Latency: Hardware-accelerated encoding reduces latency from 100-150ms to 50-100ms.
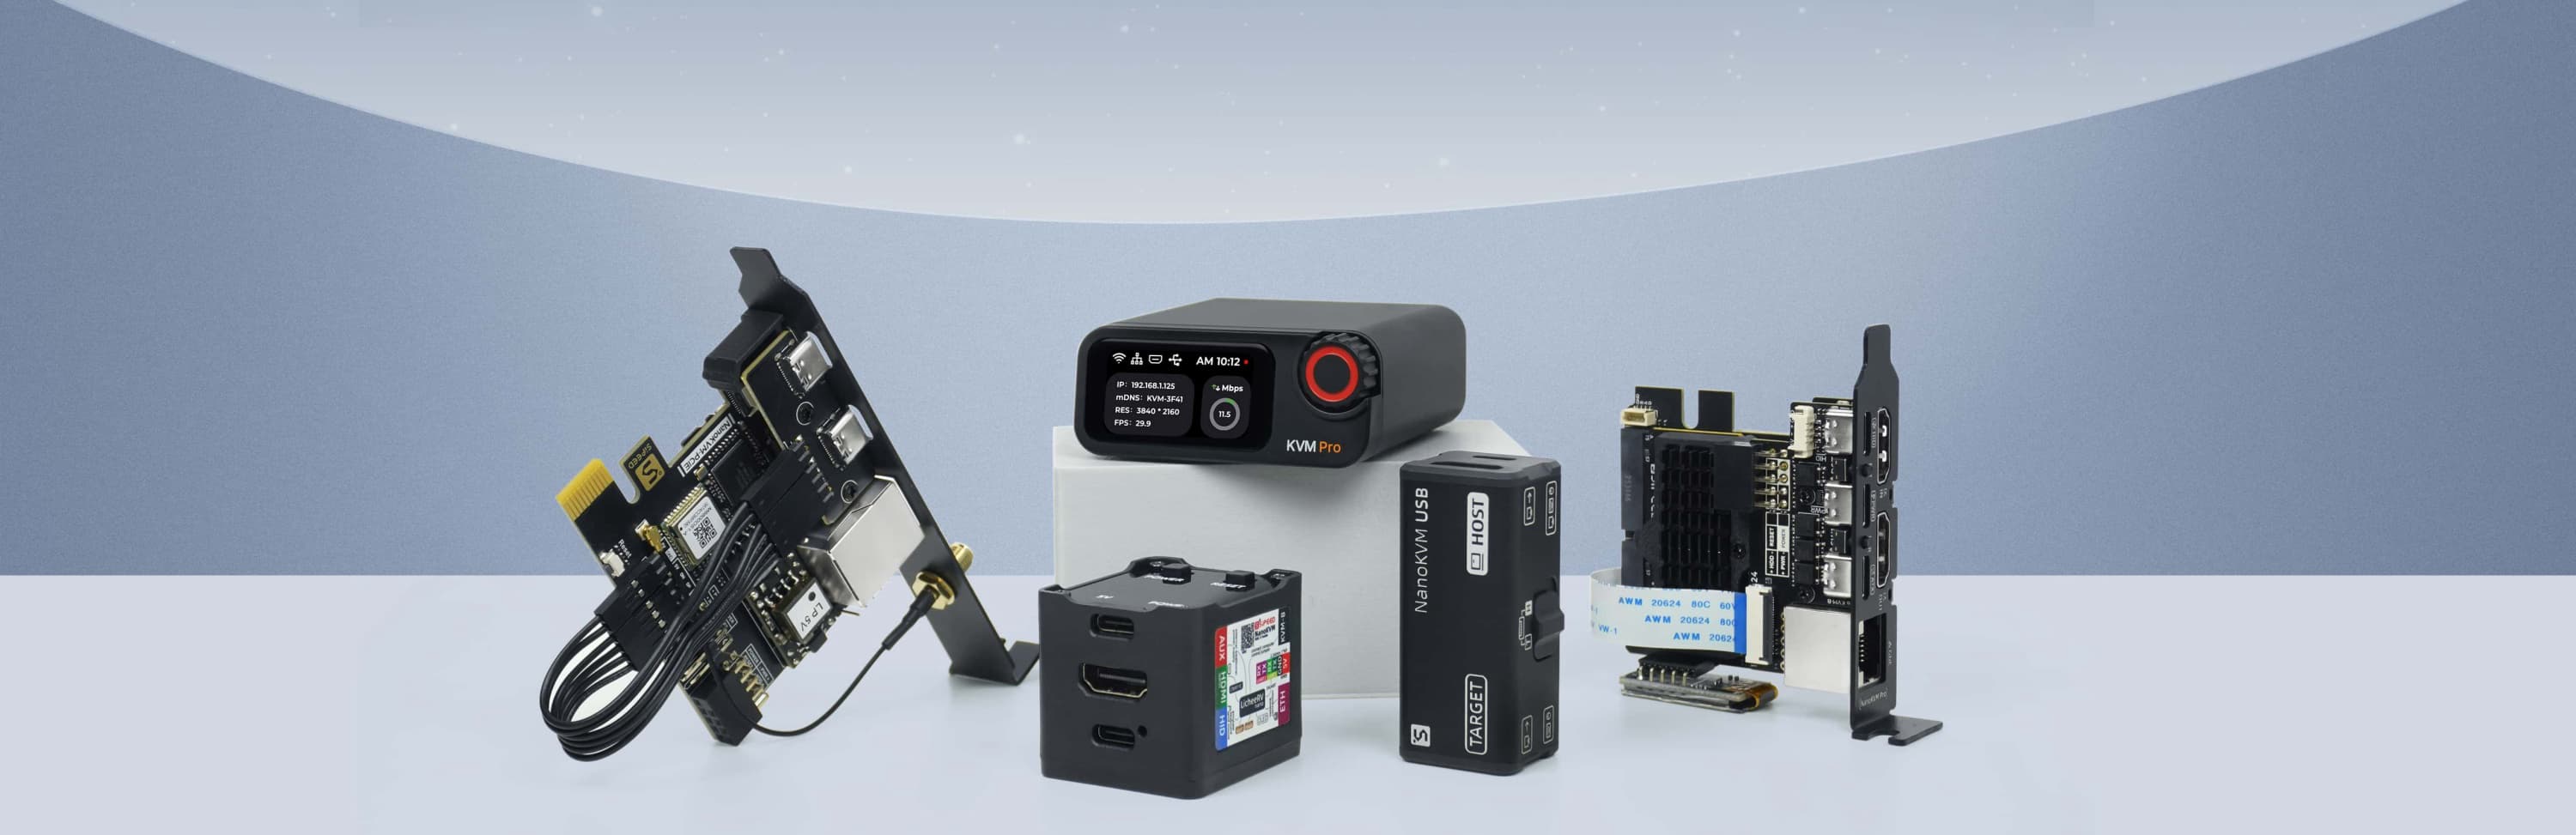
If you are looking for a USB-based KVM solution, check out NanoKVM-USB.
🛠️ Technical Specifications
| Feature | NanoKVM-Pro | NanoKVM (Cube/PCIe) | GxxKVM | JxxKVM |
|---|---|---|---|---|
| Core | AX630C 2xA53 1.2G | SG2002 1xC906 1.0G | RV1126 4xA7 1.5G | RV1106 1xA7 1.2G |
| Memory & Storage | 1G LPDDR4X + 32G eMMC | 256M DDR3 + 32G microSD | 1G DDR3 + 8G eMMC | 256M DDR3 + 16G eMMC |
| System | NanoKVM / PiKVM | NanoKVM | GxxKVM | JxxKVM |
| Resolution | 4K@30fps / 2K@60fps | 1080P@60fps | 4K@30fps / 2K@60fps | 1080P@60fps |
| HDMI Loopout | 4K loopout | — | — | — |
| Video Encoding | MJPEG / H.264 / H.265 | MJPEG / H.264 | MJPEG / H.264 | MJPEG / H.264 |
| Audio Transmit | ✓ | — | ✓ | — |
| UEFI / BIOS | ✓ | ✓ | ✓ | ✓ |
| Emulated USB Keyboard & Mouse | ✓ | ✓ | ✓ | ✓ |
| Emulated USB ISO | ✓ | ✓ | ✓ | ✓ |
| IPMI | ✓ | ✓ | ✓ | — |
| Wake-on-LAN | ✓ | ✓ | ✓ | ✓ |
| Web Terminal | ✓ | ✓ | ✓ | ✓ |
| Serial Terminal | 2 channels | 2 channels | — | 1 channel |
| Custom Scripts | ✓ | ✓ | — | — |
| Storage | 32G eMMC 300MB/s | 32G MicroSD 12MB/s | 8G eMMC 120MB/s | 8G eMMC 60MB/s |
| Ethernet | 1000M | 100M | 1000M | 100M |
| PoE | Optional | Optional | — | — |
| Wi-Fi | Optional Wi-Fi 6 | Optional Wi-Fi 6 | — | — |
| ATX Power Control | ✓ | ✓ | Extra $15 | Extra $10 |
| Display | 1.47" 320x172 LCD / 0.96" 128x64 OLED | 0.96" 128x64 OLED | — | 1.68" 280x240 |
| More Features | Sync LED Strip / Smart Assistant | — | — | — |
| Power Consumption | 0.6A@5V | 0.2A@5V | 0.4A@5V | 0.2A@5V |
| Power Input | USB-C or PoE | USB-C | USB-C | USB-C |
| Dimensions | 65x65x26mm | 40x36x36mm | 80x60x17.5mm | 60x43x(24~31)mm |
📂 Project Structure
├── kvmapp          # APP update package
│   ├── jpg_stream  # Legacy support for direct updates from older versions
│   ├── kvm_new_app # Triggers components for kvm_system updates
│   ├── kvm_system  # Core KVM application
│   ├── server      # Front-end and back-end integration
│   └── system      # Essential system components
├── web             # NanoKVM Front-end (UI)
├── server          # NanoKVM Back-end (Service)
├── support         # Auxiliary modules (Image subsystem, status, updates, OLED, HID, etc.)
├── ...
💻 Development
Start with the guide that matches the part of NanoKVM you want to work on:
- System support modules: Build and update the low-level hardware support components in support/sg2002/README.md.
- Backend service: Set up, build, and understand the Go service in server/README.md.
- Frontend UI: Develop, lint, and build the React interface in web/README.md.
- Release packaging: Assemble the
nanokvm_<version>.tar.gzupdate package in scripts/README.md.
Backend compilation and runtime validation require the target toolchain or a NanoKVM device. See the module-specific guides above for the latest development workflow.
Dev container (optional)
The repository ships a Dev Container setup (.devcontainer/) that layers the frontend toolchain (Node 22, pnpm 11) on top of the release builder image (RISC-V cross toolchain, Go, MaixCDK), so one container covers Go, C support-layer and web development. It is a convenience for IDE users; the make targets in the repository root remain the canonical CLI workflow.
- Requirements: Docker plus an editor or CLI with dev container support (e.g. the VS Code "Dev Containers" extension, or
devcontainer up). - On creation the container prepares itself automatically:
support/sg2002/build update_lib(resyncs MaixCDK components with the checkout) andpnpm installfor the frontend. - Backend: run
server/build.shfor a release-equivalent binary (BoringCrypto +dl_libRPATH).make appbuilds a plain development binary without those, so preferserver/build.shwhenever the result should match a release. - Support layer:
cd support/sg2002 && ./build kvm_system(the MaixCDK virtualenv is part of the container environment). - Frontend:
cd web && pnpm dev(VS Code forwards port 3001 automatically; other clients may need to map it themselves); see web/README.md for pointing it at a device. - The base image
ghcr.io/sipeed/nanokvm-builder:latestis x86-64 only; on Apple Silicon it runs under emulation (works, but C builds are slow). You can also build the image locally first (make builder-image) and point theBASE_IMAGEbuild arg at it (e.g. viabuild.argsindevcontainer.json). On Linux hosts the first container creation also takes a while: the container user is remapped to your uid, which re-chowns its home directory once. - Hardware-dependent verification still requires a real NanoKVM device; the container covers compiling, linting and mock-mode web development only.
🔩 Hardware Platform (NanoKVM Cube/PCIe)
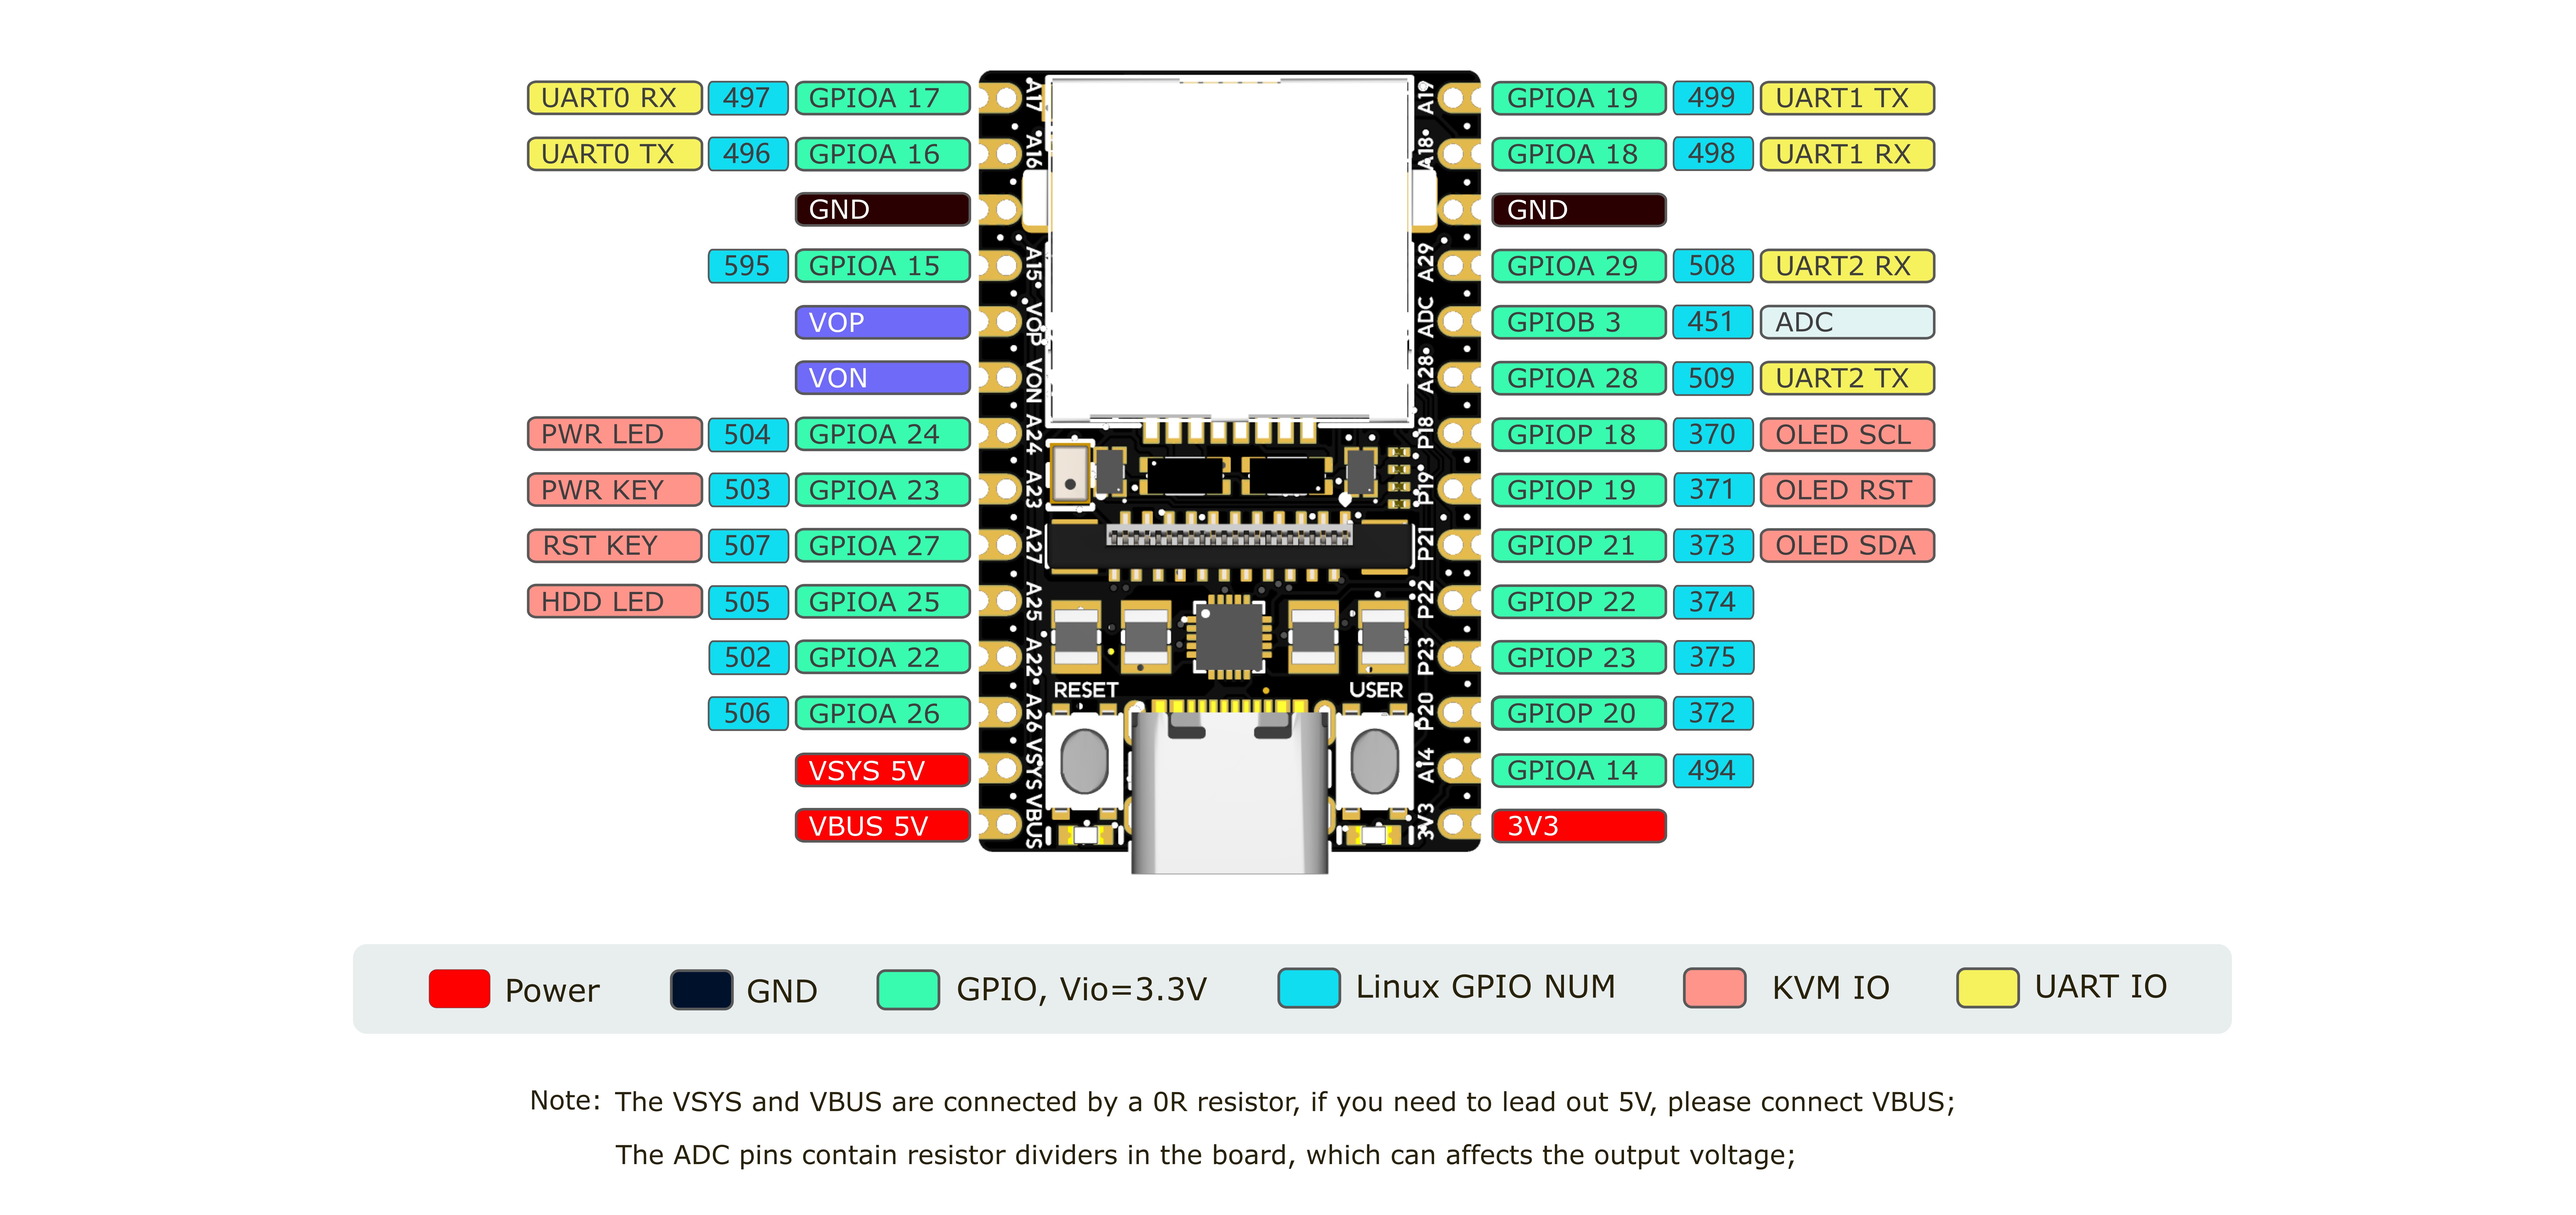
NanoKVM is based on Sipeed LicheeRV Nano. You can find specifications, schematics, and dimensional drawings in the download station.
The NanoKVM Cube/PCIe hardware is built from these components:
- NanoKVM Lite: LicheeRV Nano plus the HDMI-to-CSI board.
- NanoKVM Full: NanoKVM Lite plus the NanoKVM-A/B boards and enclosure.
- HDMI-to-CSI board: Converts the HDMI input signal.
- NanoKVM-A board: Provides OLED, ATX control output through USB-C, auxiliary power, and physical ATX power/reset buttons.
- NanoKVM-B board: Connects NanoKVM-A to the host computer's ATX pins for remote power control.
The NanoKVM image is built with the LicheeRV Nano SDK and MaixCDK. It is intended for NanoKVM hardware and is not a general-purpose KVM software package for other LicheeRV Nano or SG2002 products. If you want to build an HDMI input application on LicheeRV Nano or MaixCam, please contact us for technical support.
Note: Of the 256MB memory on SG2002, 158MB is currently allocated to the multimedia subsystem for video capture and processing.
🤝 Contributing
We welcome contributions. To get started:
- Fork the repository.
- Create a feature branch.
- Commit your changes.
- Push to the branch.
- Open a Pull Request.
Please keep your pull requests small and focused to facilitate easier review and merging.
🎁 Contributors who submit high-quality Pull Requests may receive a NanoKVM Cube, PCIe, or Pro as a token of our appreciation!
🛒 Where to Buy
💬 Community & Support
- Discord
- QQ group: 703230713
- Email: support@sipeed.com
- FAQ
📜 License
This project is licensed under the GPL-3.0 License. See LICENSE for details.